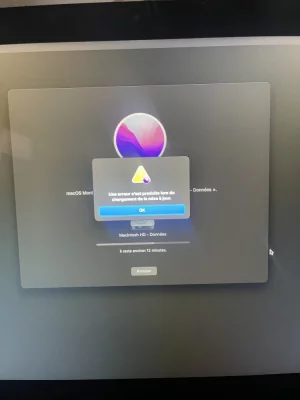
Sujet unique Si « les informations du programme d'installation sur le serveur de récupération sont endommagées »

Alors branche-la au Mac. Tu as un Terminal dans ta session à la localisation : Applications > Utilitaires > Terminal.

- passe la commande :​
Bloc de code:
diskutil list external
  • qui affiche la configuration du disque externe seule

Poste le retour en copier-coller > en veillant à faire le coller dans un Bloc de code (c'est plus lisible !) par le procédé suivant -->

- en bas de cette page des forums MacGé => utilise le menu (le 17è depuis la gauche = vers le milieu de la barre) dans la barre de menus au-dessus du champ de saisie d'un message > sous-menu : </> (= Bloc de code) => tu fais ton coller dans la fenêtre de code et Continuer.​

=> ces informations montreront la configuration de la clé. Il y a des chances qu'il faille la reparamétrer.
 
Bloc de code:
   #:                       TYPE NAME                    SIZE       IDENTIFIER
   0:     FDisk_partition_scheme                        *31.0 GB    disk2
   1:             Windows_FAT_32 USB                     31.0 GB    disk2s1

/dev/disk3 (disk image):
   #:                       TYPE NAME                    SIZE       IDENTIFIER
   0:      GUID_partition_scheme                        +12.9 GB    disk3
   1:                        EFI EFI                     209.7 MB   disk3s1
   2:                  Apple_HFS Shared Support          12.5 GB    disk3s2
 
Bien posté ! Ta clé a des paramètres Windows > incompatibles ici avec un média démarrable pour Mac. Passe la commande (copier-coller) :
Bloc de code:
diskutil eraseDisk jhfs+ CLE gpt disk2 ; diskutil list disk2
  • la commande reparamètre la clé : table GPT > format jhfs+ > volume CLE - puis affiche la configuration résultante

Poste le retour.
 
Bloc de code:
Started erase on disk2
Unmounting disk
Creating the partition map
Waiting for partitions to activate
Formatting disk2s2 as Mac OS Extended (Journaled) with name CLE
Initialized /dev/rdisk2s2 as a 29 GB case-insensitive HFS Plus volume with a 8192k journal
Mounting disk
Finished erase on disk2
/dev/disk2 (external, physical):
   #:                       TYPE NAME                    SIZE       IDENTIFIER
   0:      GUID_partition_scheme                        *31.0 GB    disk2
   1:                        EFI EFI                     209.7 MB   disk2s1
   2:                  Apple_HFS CLE                     30.7 GB    disk2s2
 
Parfait. Tu as bien un installateur : Installer macOS Monterey dans les Applications ? --> que je te passe la commande de configuration de la clé...
 
Alors passe la commande (copier-coller) :
Bloc de code:
sudo /Ap*/*Monterey*/C*/R*/createinstallmedia --volume /Vol*/CLE --nointeraction
  • à validation > une demande de password s'affiche (commande sudo) --> tape ton mot-de-passe de session admin en aveugle - aucun caractère ne se montrant à la frappe - et revalide
  • la commande configure le volume CLE en volume d'installation démarrable de Monterey. CLE va être reformaté > renommé : Install macOS Monterey > l'installateur : Installer macOS Monterey copié dans le volume > des fichiers de démarrage de l'OS d'installation inclus créés > enfin un chemin de démarrage inscrit sur l'en-tête du volume. Comme il y a 12 Go à copier --> ça va prendre du temps. Attends patiemment le ré-affichage de l'invite de commande du terminal en signal de fin.

Poste alors le retour.
 
Bloc de code:
Password:
Erasing disk: 0%... 10%... 20%... 30%... 100%
Making disk bootable...
Copying to disk: 0%... 10%... 20%... 30%... 40%... 50%... 60%... 70%... 80%... 90%... 100%
Install media now available at "/Volumes/Install macOS Monterey"
 
Parfait. Ta clé est opérationnelle -->

- éjecte-la du Mac. Branche-la à ton Mac en panne d'installation. Démarre-le > la touche "alt" tenue pressée pour obtenir l'écran de choix du volume de démarrage. Choisis : Install macOS Monterey (volume de la clé) > démarre dessus.​
- quand tu obtiens un écran affichant 4 Utilitaires macOS (comme celui d'une session de secours) > lance l'option : "Installer macOS Monterey" => et choisis Macintosh HD - Données en destination d'installation quand cela te sera proposé.​

Tu n'auras qu'à dire comment ça s'est passé...
 
Bon. On va explorer alors plusieurs façons d'échapper à ce blocage.

- démarré encore sur ta clé d'installation > lance le Terminal et passe la commande :​
Bloc de code:
diskutil list internal
  • affichant la configuration du disque interne

Poste le retour (dans un bloc de code).
 
Bloc de code:
/dev/disk0 (internal, physical):
   #:                       TYPE NAME                    SIZE       IDENTIFIER
   0:      GUID_partition_scheme                        *1.0 TB     disk0
   1:                        EFI ⁨EFI⁩                     209.7 MB   disk0s1
   2:                 Apple_APFS ⁨Container disk1⁩         1000.0 GB  disk0s2

/dev/disk1 (synthesized):
   #:                       TYPE NAME                    SIZE       IDENTIFIER
   0:      APFS Container Scheme -                      +1000.0 GB  disk1
                                 Physical Store disk0s2
   1:                APFS Volume ⁨Macintosh HD - Données⁩  151.8 GB   disk1s1
   2:                APFS Volume ⁨Preboot⁩                 331.1 MB   disk1s2
   3:                APFS Volume ⁨Recovery⁩                1.1 GB     disk1s3
   4:                APFS Volume ⁨VM⁩                      5.4 GB     disk1s4
 
Passe la commande :
Bloc de code:
diskutil ap resizeContainer disk1 700g jhfs+ TEST 0b
  • la commande rétrécit le Conteneur apfs à 700 Go > et crée un volume TEST de 300 Go en format standard. L'opération peut prendre un moment à s'exécuter.

Poste le retour.
 
Bloc de code:
Started APFS operation
Aligning shrink delta to 299 995 131 904 bytes and targeting a new physical store size of 699 999 997 952 bytes
Determined the minimum size for the targeted physical store of this APFS Container to be 175 355 461 632 bytes
Resizing APFS Container designated by APFS Container Reference disk1
The specific APFS Physical Store being resized is disk0s2
Verifying storage system
Performing fsck_apfs -n -x /dev/disk0s2
Checking the container superblock
Checking the EFI jumpstart record
Checking the space manager
Checking the space manager free queue trees
Checking the object map
Checking the encryption key structures
Checking volume /dev/rdisk1s1
Checking the APFS volume superblock
Checking the object map
Checking the snapshot metadata tree
Checking the snapshot metadata
Checking the extent ref tree
Checking the document ID tree
Checking the fsroot tree
Verifying volume object map space
The volume /dev/rdisk1s1 appears to be OK
Checking volume /dev/rdisk1s2
Checking the APFS volume superblock
Checking the object map
Checking the snapshot metadata tree
Checking the snapshot metadata
Checking the extent ref tree
Checking the fsroot tree
Verifying volume object map space
The volume /dev/rdisk1s2 appears to be OK
Checking volume /dev/rdisk1s3
Checking the APFS volume superblock
Checking the object map
Checking the snapshot metadata tree
Checking the snapshot metadata
Checking the extent ref tree
Checking the fsroot tree
Verifying volume object map space
The volume /dev/rdisk1s3 appears to be OK
Checking volume /dev/rdisk1s4
Checking the APFS volume superblock
Checking the object map
Checking the snapshot metadata tree
Checking the snapshot metadata
Checking the extent ref tree
Checking the fsroot tree
Verifying volume object map space
The volume /dev/rdisk1s4 appears to be OK
Checking volume /dev/rdisk1s6
Checking the APFS volume superblock
Checking the object map
Checking the snapshot metadata tree
Checking the snapshot metadata
Checking the extent ref tree
Checking the fsroot tree
Verifying volume object map space
The volume /dev/rdisk1s6 appears to be OK
Verifying allocated space
The container /dev/disk0s2 appears to be OK
Storage system check exit code is 0
Shrinking APFS Physical Store disk0s2 from 999 995 129 856 to 699 999 997 952 bytes
Shrinking APFS data structures
Shrinking partition
Modifying partition map
Initialized /dev/rdisk0s3 as a 279 GB case-insensitive HFS Plus volume with a 24576k journal
Mounting disk
1 new disk created or changed due to APFS operation
Disk from APFS operation: disk0s3
Finished APFS operation
 
Le repartitionnement a bien été effectué. Passe la commande complémentaire :
Bloc de code:
diskutil ap convert disk0s3
  • la commande convertit le nouveau volume TEST à l'apfs

Poste le retour.
 
Bloc de code:
Converting the volume on disk0s3 to an APFS Volume on an APFS Container
Started APFS operation on disk0s3 (TEST)
Converting HFS Volume to an APFS Container which will export one APFS Volume
The target is the Journaled HFS+ volume "TEST" backed by the GPT partition disk0s3
The target is a macOS system disk
Found APFS EFI driver /usr/standalone/i386/apfs.efi to install into the APFS Container
The target is not encrypted
Unmounting disk0s3
Starting conversion from HFS to APFS
Performing apfs_hfs_convert -x --verbose=0x400 --efi /usr/standalone/i386/apfs.efi /dev/disk0s3
Reporting pre-conversion statistics
Reporting post-conversion statistics
Successfully finished conversion from HFS to APFS
Successful conversion in commit mode so will switch type to APFS
Setting type of disk0s3 to APFS
Changing the physical disk partition type in shared mode
Partition modification attempt count was 1
Opening and closing disk0s3 to terminate old content driver
Expecting the new APFS Container at Physical Store disk0s3
Confirmed existence of new unencrypted APFS Volume disk5s1
Mounting APFS Volume disk5s1
APFS Volume mount attempt result was 0
Exiting conversion operations with error code 0
Disk from APFS operation: disk5s1
Finished APFS operation on disk0s3 (TEST)
 
Conversion effectuée. Voici le plan à présent -->

- dans la fenêtre d'accueil de la session de ta clé > lance l'option : "Réinstaller macOS Monterey" => et choisis cette fois-ci le volume vide TEST en destination d'installation. Si l'installation réussissait > tu pourrais à la fin récupérer les données de Macintosh HD - Données via l'Assistant de migration.​

Tu n'as qu'à dire si tu as encore le blocage à la mention de 12' restantes ou pas.